Table of contents
- 🔑 Key Exam Takeaways
- Use Lambda, SQS and S3 to process images automatically
- 🎯 What You’ll Build
- 📋 Prerequisites
- 🛠️ Step-by-Step Implementation
- 📊 What’s Happening Behind the Scenes
- 🧪 Quick Test Without PIL (Simplified Version)
- 🧹 Clean Up (Important!)
- 📝 Summary of the Architecture’s Benefits
- Delete cloudWatch storage
- CloudWatch metrics storage period
- what’s the difference between the database read replica and the Multi-AZ replica
- About the database storage
- Public IP vs Private IP of instnace
- Simple example to build a private EC2 instance that can access the internet only through a NAT Gateway (no public IP on the instance). Comes from DeepSeek result
- 🎯 What You Will Build
- 🧱 Step 1: Create the VPC and Subnets
- 🔁 Step 2: Create a NAT Gateway (in the Public Subnet)
- 🔗 Step 3: Update the Private Route Table to Use the NAT Gateway
- 🖥️ Step 4: Launch a Private EC2 Instance (No Public IP)
- 🔑 Step 5: Connect to the Private Instance
- ✅ Step 6: Verify Internet Access Through the NAT Gateway
- 🧹 Step 7: Clean Up (Avoid Unexpected Charges)
- 📊 Summary of What You Have Accomplished
- 💡 What to Try Next
🔑 Key Exam Takeaways
When you see these requirements, think Serverless:
| Requirement | Indicates |
|---|---|
| “Millions of requests per hour” | Needs automatic scaling |
| “Millisecond latency” | DynamoDB + CloudFront |
| “LEAST operational overhead” | Serverless (no servers to manage) |
| “One-deal-a-day” | Simple access pattern - perfect for DynamoDB |
| “Static content” + “backend APIs” | S3 + CloudFront + API Gateway + Lambda |
The serverless architecture (S3 + CloudFront + API Gateway + Lambda + DynamoDB) is AWS’s recommended pattern for highly scalable, low-latency web applications with minimal operational overhead.
Use Lambda, SQS and S3 to process images automatically
The following steps come from DeepSeek
This example will help you understand how S3, SQS, and Lambda work together to process images automatically.
🎯 What You’ll Build
A fully automated image processing pipeline:
User uploads "photo.jpg" → S3 bucket (raw-images) → SQS queue → Lambda → S3 bucket (compressed-images)
When a user uploads an image to the raw-images bucket:
- S3 automatically sends a notification to an SQS queue
- Lambda polls the queue and processes the image
- Lambda compresses it and saves it to the
compressed-imagesbucket - Lambda deletes the message from the queue (success tracking)
📋 Prerequisites
- AWS account (free tier works)
- Basic knowledge of navigating AWS Console
🛠️ Step-by-Step Implementation
Step 1: Create Two S3 Buckets
- Open S3 Console → Create bucket
Bucket 1 (Raw images):
- Name:
raw-images-yourname(use a globally unique name) - Region:
us-east-1 - Leave all default settings
- Click Create bucket
Bucket 2 (Compressed images):
- Name:
compressed-images-yourname - Region:
us-east-1 - Leave all default settings
- Click Create bucket
Step 2: Create an SQS Queue
- Open SQS Console → Create queue
- Configure:
- Type: Standard
- Name:
image-processing-queue - Visibility timeout:
60seconds (time for Lambda to process) - Message retention period:
300seconds (5 minutes for testing) - Leave everything else default
- Click Create queue
Here you need to modify the SQS Access policy to enable S3 to connect to the queue.
{
  "Version": "2012-10-17",
  "Id": "example-ID",
  "Statement": [
    {
      "Sid": "Allow S3 to send message",
      "Effect": "Allow",
      "Principal": {
        "Service": "s3.amazonaws.com"
      },
      "Action": "SQS:SendMessage",
      "Resource": "arn:aws:sqs:us-east-1:<YOUR-AWS-ID>:image-processing-queue",
      "Condition": {
        "StringEquals": {
          "aws:SourceAccount": "<YOUR-AWS-ID>"
        },
        "ArnLike": {
          "aws:SourceArn": "arn:aws:s3:::raw-images-yourname"
        }
      }
    }
  ]
}
Step 3: Configure S3 to Send Notifications to SQS
- Go to your
raw-images-yournamebucket - Click Properties tab
- Scroll to Event notifications → Click Create event notification
- Configure:
- Event name:
image-upload-event - Event types: Select
PutandPost(covers all upload methods) - Destination: Select SQS queue
- Specify SQS queue: Choose
image-processing-queue
- Event name:
- Click Save changes
✅ Test this step: Upload a test file to the bucket. You should see a message appear in the SQS queue (SQS Console →
image-processing-queue→ Send and receive messages → Poll for messages).
Step 4: Create the Lambda Function
4.1 Create IAM Role for Lambda
- Open IAM Console → Roles → Create role
- Select AWS service → Lambda → Next
- Search and attach these policies:
AWSLambdaBasicExecutionRole(CloudWatch logs)AmazonSQSFullAccess(for simplicity; in production, restrict permissions)AmazonS3FullAccess(for simplicity; in production, restrict to specific buckets)
- Click Next
- Role name:
lambda-sqs-s3-role→ Create role
4.2 Create the Lambda Function
- Open Lambda Console → Create function
- Configure:
- Function name:
image-processor - Runtime:
Python 3.12(or latest) - Architecture:
x86_64 - Permissions: Choose Use an existing role → select
lambda-sqs-s3-role
- Function name:
- Click Create function
4.3 Add SQS Trigger to Lambda
- In your Lambda function, click Add trigger
- Configure:
- Source:
SQS - SQS queue:
image-processing-queue - Batch size:
1(process one image at a time)
- Source:
- Click Add
⚠️ Important: This automatically enables Lambda to poll the queue. Lambda will delete the message only after your function returns a success status.
4.4 Add the Processing Code
Replace the default code with:
import boto3
import os
from PIL import Image
import io

s3 = boto3.client('s3')

def lambda_handler(event, context):
    # Loop through each message (batch size may be >1)
    for record in event['Records']:
        # Step 1: Parse the S3 event from the SQS message body
        sqs_body = record['body']

        # The S3 event is JSON, so we can parse it directly
        import json
        s3_event = json.loads(sqs_body)

        # Step 2: Extract bucket and object key
        for s3_record in s3_event.get('Records', []):
            source_bucket = s3_record['s3']['bucket']['name']
            source_key = s3_record['s3']['object']['key']

            print(f"Processing: {source_bucket}/{source_key}")

            # Step 3: Download the image
            response = s3.get_object(Bucket=source_bucket, Key=source_key)
            original_image = Image.open(io.BytesIO(response['Body'].read()))

            # Step 4: Compress the image (resize to 50%)
            width, height = original_image.size
            compressed_image = original_image.resize((width // 2, height // 2))

            # Step 5: Save to compressed image bucket
            compressed_buffer = io.BytesIO()
            compressed_image.save(compressed_buffer, format='JPEG', quality=85)
            compressed_buffer.seek(0)

            target_bucket = os.environ.get('TARGET_BUCKET', 'compressed-images-yourname')
            target_key = f"compressed_{source_key}"

            s3.put_object(
                Bucket=target_bucket,
                Key=target_key,
                Body=compressed_buffer,
                ContentType='image/jpeg'
            )

            print(f"Saved compressed image to: {target_bucket}/{target_key}")

    # Return success → Lambda automatically deletes SQS messages
    return {
        'statusCode': 200,
        'body': f'Processed {len(event["Records"])} images'
    }
4.5 Add Environment Variable
- In Lambda console, go to Configuration → Environment variables
- Click Edit → Add environment variable
- Key:
TARGET_BUCKET - Value:
compressed-images-yourname(your actual bucket name) - Click Save
4.6 Add Layer for PIL (Python Imaging Library)
Lambda doesn’t have PIL by default. You need to add a layer:
🚀 Using a Klayers Layer ARN (Easiest)
The Klayers project builds and maintains pre-compiled Python layers for Lambda. This is the simplest method because you only need to copy a specific ARN (Amazon Resource Name).
- Find your Region’s ARN: Visit the Klayers GitHub repository page (
github.com/keithrozario/Klayers). You’ll need to navigate through the folders: Go todeployments→production→us-east-1(or your specific region) →python→3.11(or your runtime) →json→Pillow. Inside the JSON file, you will find a key calledarn. This is the string you need. - Add the ARN to your Lambda:
- In the Lambda console, open your
image-processorfunction. - Click on the Layers tab, then Add a layer.
- Select Specify an ARN.
- Paste the ARN you copied (e.g.,
arn:aws:lambda:us-east-1:770693421928:layer:Klayers-p311-Pillow:10) and click Verify.
- In the Lambda console, open your
- Verify: The console will confirm the layer exists and show its version. Click Add.
Step 5: Test the Complete Flow
5.1 Upload a Test Image
- Create a small JPG file or download a sample image
- Upload it to your
raw-images-yournamebucket - Wait 10-15 seconds
5.2 Check the Results
- Check Lambda logs:
- Lambda Console →
image-processor→ Monitor → View CloudWatch logs - You should see log entries showing the processing
- Lambda Console →
- Check SQS queue:
- SQS Console →
image-processing-queue→ Send and receive messages → Poll for messages - The message should have been automatically deleted (no messages visible)
- SQS Console →
- Check the target bucket:
- Go to
compressed-images-yournamebucket - You should see a new file named
compressed_<original-filename>.jpg
- Go to
📊 What’s Happening Behind the Scenes
sequenceDiagram
    participant User
    participant S3 as S3 (raw-images)
    participant SQS as SQS Queue
    participant Lambda as Lambda Function
    participant S3_Comp as S3 (compressed-images)

    User->>S3: 1. Upload image.jpg
    S3->>SQS: 2. Send event notification
    Note over SQS: Message stored<br/>(durable, persistent)

    Lambda->>SQS: 3. Poll for messages
    SQS-->>Lambda: 4. Return image.jpg event
    Lambda->>S3: 5. Download image.jpg
    Lambda->>Lambda: 6. Compress image
    Lambda->>S3_Comp: 7. Upload compressed image
    Lambda->>SQS: 8. Delete message (success)

    Note over Lambda: Message deleted only<br/>after successful processing
🧪 Quick Test Without PIL (Simplified Version)
If you can’t add the PIL layer, here’s a simpler Lambda that just logs the event:
import boto3
import json

def lambda_handler(event, context):
    for record in event['Records']:
        sqs_body = json.loads(record['body'])

        for s3_record in sqs_body.get('Records', []):
            bucket = s3_record['s3']['bucket']['name']
            key = s3_record['s3']['object']['key']

            print(f"✅ Image uploaded: s3://{bucket}/{key}")
            print(f"📦 Queue message ID: {record['messageId']}")

    # Return success → Lambda deletes the message
    return {'statusCode': 200, 'body': 'Logged successfully'}
This still demonstrates the stateless, durable architecture:
- ✅ SQS holds the message
- ✅ Lambda processes it
- ✅ Message deleted on success
🧹 Clean Up (Important!)
To avoid ongoing charges:
- Delete S3 buckets: Empty both buckets, then delete them
- Delete SQS queue:
image-processing-queue - Delete Lambda function:
image-processor - Delete IAM role:
lambda-sqs-s3-role - Delete CloudWatch log groups (optional, costs minimal)
📝 Summary of the Architecture’s Benefits
| Requirement | How This Example Satisfies It |
|---|---|
| Durable | SQS stores messages for up to 14 days; if Lambda fails, message stays in queue |
| Stateless | Lambda has no state; SQS holds all state information |
| Automatic | S3 → SQS → Lambda all fully automated |
| Decoupled | S3 and Lambda communicate only through SQS |
| Scalable | SQS and Lambda scale automatically with load |
Would you like me to help you debug any specific step, or explain how to set up a dead-letter queue for failed messages?
Delete cloudWatch storage
Every log stream must be in a log group. The retention period setting of a log group controls how long CloudWatch retains log events within those streams. You can’t manually delete log events individually, but you can delete all events in a log stream by deleting the stream. You can’t set a retention period on a log stream directly.
CloudWatch metrics storage period
- Metrics stored at one‐hour resolution age out after : 15 months.
- Five‐minute resolutions are stored for : 63 days.
- One‐minute resolution metrics are stored for :15 days.
- High‐resolution metrics are kept for 3 hours.
what’s the difference between the database read replica and the Multi-AZ replica
The core difference between a Read Replica and a Multi-AZ replica lies in their fundamental purpose: Read Replicas are for scaling read-heavy database workloads, while Multi-AZ deployments are for ensuring high availability and disaster recovery.
Here is a summary of their key differences to help you understand the core concepts:
| Feature | Read Replica | Multi-AZ Replica (Standby) |
|---|---|---|
| Primary Purpose | Scalability: Offloads read traffic from the primary database to improve performance and throughput. | High Availability (HA): Provides automatic failover to a standby instance to ensure database uptime in case of a failure. |
| Accessibility | Actively used for read-only traffic (e.g., reporting, analytics). Your applications can connect directly to it. | Passive standby. Not used for read traffic (with the standard one-standby deployment) unless a failover occurs. |
| Replication Type | Asynchronous. Updates from the primary are applied to the replica after they are committed. This means the replica may be slightly behind the primary. | Synchronous (for the one-standby model). Data is written to the primary and standby at the same time, ensuring no data loss during a failover. |
| Impact on Primary | Low. Offloading reads frees up the primary’s compute capacity for write operations, improving overall application performance. | Noticeable. Synchronous replication adds a small amount of latency to write operations, as the primary must wait for the standby to confirm the write. |
| Failover Process | Manual. You must promote the read replica to become its own standalone primary database. | Automatic. In a failure, AWS automatically flips the DNS record to point to the standby with no manual intervention. |
| Number of Copies | Up to 15 per primary database, allowing for significant read scaling. | One standby replica (for the standard one-standby deployment), located in a different Availability Zone. |
| Best For | Read-heavy applications, reporting, dashboards, and analytics that need to offload the primary database. | Production databases where high availability, data durability, and automatic failover are critical. |
In short, you use a Read Replica to make your application faster when many people are reading data, and you use a Multi-AZ deployment to make sure your database stays online even if something breaks.
About the database storage
Memory‐optimized instances are EBS optimized, providing dedicated bandwidth for EBS storage. Standard instances are not EBS optimized and top out at 10,000 Mbps disk throughput. Burstable performance instances are designed for development and test workloads and provide the lowest disk throughput of any instance class. There is no instance class called storage optimized.
General‐purpose SSD storage allocates three IOPS per gigabyte, up to 10,000 IOPS. Therefore, to get 600 IOPS, you’d need to allocate 200 GB. Allocating 100 GB would give you only 300 IOPS. The maximum storage size for gp2 storage is 16 TB, so 200 TB is not a valid value. The minimum amount of storage you can allocate depends on the database engine, but it’s no less than 20 GB, so 200 MB is not valid.
- io1 ratio for storage is : 50 IOPS to 1 GB
- Standard SSD (gp3) ratio for storage is: 3 IOPS to 1 GB
- MySQL,MariaDB for io1 ratio: 1 IOPS is : 16kb
- Oracle, PostgreSQL, and Microsoft SQL Server use a page size of : 8 KB.
- DynamoDB:
- strongly consistent read capacity: 4kb/second;
- eventually consistent read: 8kb/second;
- Write data capacity: 1kb/second
DynamoDB reserves partitions based on the number of read capacity units (RCUs) and write capacity units (WCUs) you specify when creating a table.For an item up to 4 KB in size, one RCU buys you one strongly consistent read per second; If you use an eventually consistent read, one RCU buys you two eventually consistent reads per second. To read an 8 KB item every second using an eventually consistent read, you’d need only one RCU. When it comes to writing data, one WCU gives you one write per second for an item up to 1 KB in size.
Public IP vs Private IP of instnace
The private IP is the instance’s true source address for every single packet it sends. The public IP is just a translation that happens at the Internet Gateway (IGW) or NAT Gateway for traffic that leaves the VPC.
Simple example to build a private EC2 instance that can access the internet only through a NAT Gateway (no public IP on the instance). Comes from DeepSeek result
Below is a simple, step‑by‑step example you can complete in the AWS Console. It creates a private EC2 instance that can access the internet only through a NAT Gateway (no public IP on the instance).
The total time is about 15–20 minutes, and most of the resources are eligible for the AWS Free Tier.
🎯 What You Will Build
- A VPC with two subnets:
- Public subnet (contains the NAT Gateway)
- Private subnet (contains an EC2 instance with no public IP)
- A NAT Gateway in the public subnet (with an Elastic IP)
- A private EC2 instance (Amazon Linux) that can reach the internet through the NAT Gateway
After the setup, you will verify the private instance can access the internet by running curl ifconfig.me from it.
The following picture is the final resource map of the VPC 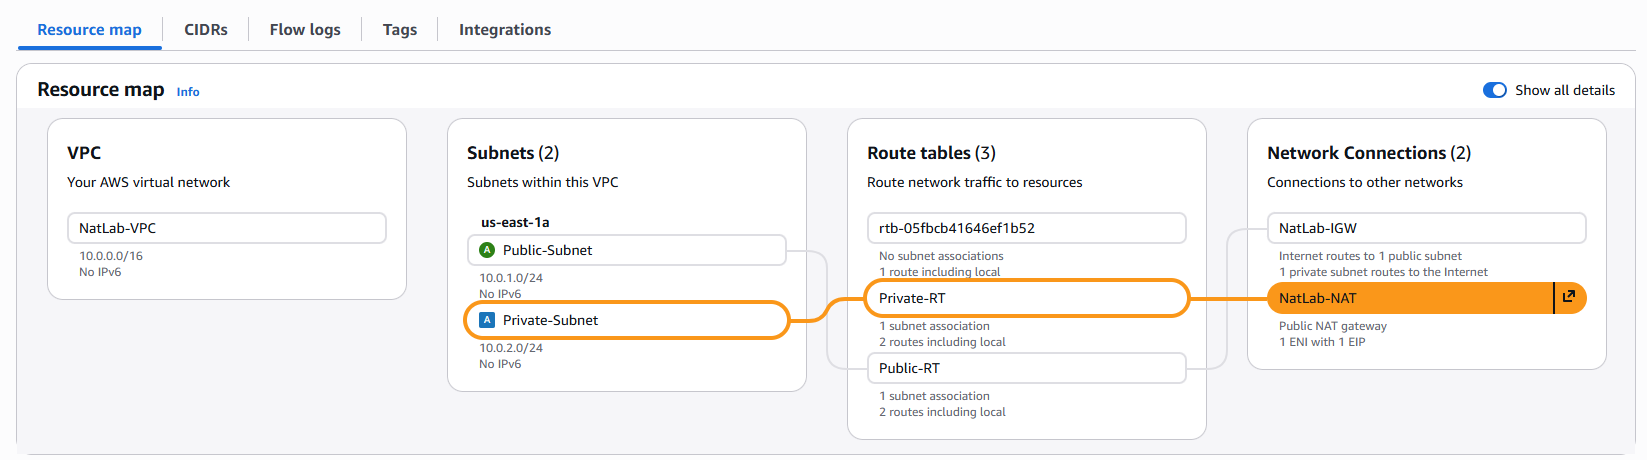
🧱 Step 1: Create the VPC and Subnets
1.1 Create a VPC
- Open the VPC Console → Your VPCs → Create VPC
- Select VPC only
- Name tag:
NatLab-VPC - IPv4 CIDR:
10.0.0.0/16 - Click Create VPC
1.2 Create the Public Subnet
- In the left menu, go to Subnets → Create subnet
- VPC ID: Select
NatLab-VPC - Subnet name:
Public-Subnet - Availability Zone: Choose any (e.g.,
us-east-1a) - IPv4 CIDR:
10.0.1.0/24 - Click Create subnet
1.3 Create the Private Subnet
- Click Create subnet again
- VPC ID: Select
NatLab-VPC - Subnet name:
Private-Subnet - Availability Zone: Use the same AZ as the public subnet (important for this simple lab)
- IPv4 CIDR:
10.0.2.0/24 - Click Create subnet
📌 Using the same Availability Zone ensures the NAT Gateway (in the public subnet) can route traffic to the private subnet without extra charges or complexity.
1.4 Create an Internet Gateway and Attach It
- Go to Internet Gateways → Create internet gateway
- Name tag:
NatLab-IGW - Click Create internet gateway
- Select the IGW → Actions → Attach to VPC → choose
NatLab-VPC→ Attach
1.5 Create Route Tables
Public Route Table
- Go to Route Tables → Create route table
- Name:
Public-RT - VPC:
NatLab-VPC - Click Create
- Select
Public-RT→ Routes tab → Edit routes → Add route:- Destination:
0.0.0.0/0 - Target:
NatLab-IGW(the Internet Gateway)
- Destination:
- Click Save changes
- Subnet associations tab → Edit subnet associations → select
Public-Subnet→ Save
Private Route Table (no internet route yet)
- Go to Route Tables → Create route table
- Name:
Private-RT - VPC:
NatLab-VPC - Click Create
- Subnet associations tab → Edit subnet associations → select
Private-Subnet→ Save
The private route table has no
0.0.0.0/0route for now. Later, you will point that route to the NAT Gateway.
🔁 Step 2: Create a NAT Gateway (in the Public Subnet)
- Go to NAT Gateways → Create NAT gateway
- Name:
NatLab-NAT - Subnet: Select
Public-Subnet - Connectivity type: Public
- Elastic IP allocation: Click Allocate Elastic IP (this creates a new EIP)
- Click Create NAT gateway
⏱️ The NAT Gateway takes 1–2 minutes to become available. Wait for the status to change from
pendingtoavailablebefore moving to the next step.
🔗 Step 3: Update the Private Route Table to Use the NAT Gateway
- Go to Route Tables → select
Private-RT - Routes tab → Edit routes → Add route:
- Destination:
0.0.0.0/0 - Target: Select NAT Gateway → choose
NatLab-NAT
- Destination:
- Click Save changes
Now any instance in Private-Subnet will use the NAT Gateway for internet access.
🖥️ Step 4: Launch a Private EC2 Instance (No Public IP)
- Open the EC2 Console → Launch instance
- Name:
Private-Instance - AMI: Amazon Linux 2023 (Free Tier eligible)
- Instance type:
t2.micro(Free Tier eligible) - Key pair: Either create a new one or select an existing key (you will need it to SSH later)
- Network settings → Edit:
- VPC:
NatLab-VPC - Subnet:
Private-Subnet - Auto-assign public IP: Disable (important!)
- Firewall (security group) : Create a new security group with:
- SSH (port 22) from
0.0.0.0/0(or your IP) - HTTP/HTTPS not required for this test
- SSH (port 22) from
- VPC:
- Advanced details → User data (paste the script below to install curl and show the public IP at launch):
#!/bin/bash
yum install -y curl
- Click Launch instance
🔑 Step 5: Connect to the Private Instance
Because the private instance has no public IP, you cannot SSH to it directly from the internet. The simplest way to connect is using EC2 Instance Connect if your AMI supports it, or you can use a bastion host. For this lab, we will use AWS Systems Manager Session Manager (no open inbound ports required).
5.1 Attach the SSM Managed Instance Core Policy
- Go to IAM Console → Roles → Create role
- Trusted entity: AWS service → EC2 → Next
- Search for and attach:
AmazonSSMManagedInstanceCore - Role name:
SSM-Role-For-EC2 - Click Create role
- Go back to the EC2 Console, select
Private-Instance→ Actions → Security → Modify IAM role → chooseSSM-Role-For-EC2→ Update IAM role - Restart the instance (Important!) : The SSM Agent may not pick up the new role immediately. A restart forces it to refresh its credentials .Select your instance → Instance state → Reboot
5.2 Connect Using Session Manager
- Go to Systems Manager Console → Session Manager
- Click Start session
- Select
Private-Instance→ Start session
You are now inside the private instance’s terminal.
✅ Step 6: Verify Internet Access Through the NAT Gateway
Inside the Session Manager terminal, run:
curl ifconfig.me
This command returns the public IP address of the NAT Gateway (the Elastic IP you allocated). If you see a valid public IP (e.g., 54.123.45.67), the private instance has successfully reached the internet through the NAT Gateway.
For more confidence, also run:
curl https://aws.amazon.com
You should see the HTML of the AWS homepage.
🧹 Step 7: Clean Up (Avoid Unexpected Charges)
- Terminate the private instance (EC2 Console → select instance → Instance state → Terminate)
- Delete the NAT Gateway (NAT Gateways → select → Actions → Delete NAT Gateway). Wait for deletion to complete (a few minutes).
- Release the Elastic IP (Elastic IPs → select → Actions → Release Elastic IP)
- Delete the VPC (VPC Console → Your VPCs → select
NatLab-VPC→ Actions → Delete VPC). This automatically deletes subnets, route tables, security groups, and the internet gateway.
⚠️ Do not skip the NAT Gateway deletion. Leaving a NAT Gateway running will incur an hourly charge (~$0.045/hour). The other resources (VPC, subnets, etc.) are free.
📊 Summary of What You Have Accomplished
| Resource | Private Instance? | Internet Access | How |
|---|---|---|---|
| Public Subnet | No | Direct (via IGW) | Route 0.0.0.0/0 → igw |
| Private Subnet | Yes (this instance) | Yes (outbound only) | Route 0.0.0.0/0 → nat + NAT Gateway in public subnet |
| NAT Gateway | No | Yes (public IP) | Translates private IPs → its own public IP |
The private instance cannot be reached from the internet (no public IP, no inbound NAT rule), but it can initiate connections to the internet through the NAT Gateway.
💡 What to Try Next
- Launch a second private instance in a different Availability Zone and observe that the NAT Gateway (which is zonal) would require you to create another NAT Gateway in that AZ for high availability.
- Replace the NAT Gateway with a NAT Instance (a self‑managed EC2) to see the cost difference.
- Add a Gateway VPC Endpoint for S3 so that traffic to S3 bypasses the NAT Gateway (saving data processing costs).
Would you like a version of this lab using AWS CloudFormation or Terraform?