Table of contents
- how to make excel cells non-editable
- How to organize your python project files and folders
- How to install docker engine on Ubuntu
- How to use the Docker container to launch streamlit website
- how to install wine in Ubuntu
- implement OCR on PC
- VSCode 链接remote server
- 在Linux电脑上安装Java
- 在Linux电脑上进行zip和unzip
- 在Linux电脑上安装wine来运行Windows软件
- 更改GitHub personal token
- 引用本地link
- 写公式
- install nodejs from source file
- python 在terminal输出颜色标记的文字
- 如何建立Google API
- 使用Google API 和 Python处理spreadsheet
Description of Hidden Markov model (HMM)
HMM is widely used in biological area. Here’s one of the definiation of HMM
A hidden Markov model (HMM) is a statistical model that can be used to describe the evolution of observable events that depend on internal factors, which are not directly observable. We call the observed event a
symboland the invisible factor underlying the observation astate. An HMM consists of two stochastic processes, namely, an invisible process of hidden states and a visible process of observable symbols. The hidden states form a Markov chain, and the probability distribution of the observed symbol depends on the underlying state. For this reason, an HMM is also called a doubly-embedded stochastic process (Rabiner, L. R. A tutorial on hidden Markov models and selected applications in speech recognition. Proc. IEEE, 1989, 77, 257-286.)
There are such situation in reality: source -> signal. above the arrow should be the process We’d like to create a signal model represent this situation. Reason why we want to create the signal model is that:
- we can control the process to get the good output, here is the singal. Like decrease the noise and enhance the musical sound
- Based on the signal source, the model giave use the potential to know the source, which we can not study directly.
- The model works well in reality
The evolution of models is Markov Model -> Hidden Markov Model
Markov Modle or I call it Markov chain is that the state is observalbe. Such as the whether. E.g Here are 3 states:
- state 1: rain
- state 2: cloudy
- state 3: sunny
The change of whether is the process of the state. Here we can observe the whether directly.
Sometimes, the state is not observable. While we are instrested about the states and want to study the states. What should we do. We need to use other observable events assocaited with the states to study the states. Thus we got the HMM. Here the state is hidden, we cannot observe it directly.
Thus we need to know the process of the states meaning we need to know the probability process of states changes. Under specific state, there is also a prbability distribution of observations. That’s quota
An HMM consists of two stochastic processes, namely, an invisible process of hidden states and a visible process of observable symbols.
Usually the HMM is depicted as the state transition and ignore the observation.
how to make excel cells non-editable
To make a column non-editable:
-
Select the whole worksheet, Right Click->Format Cells->Protection, and uncheck the “Locked” check box.
-
Select the column or cells you want to protect, right Click-> Format Cells->Protection, and select the “Locked” check box.
-
Review tab->Protect Sheet, select the “Protect worksheet and contents of locked cells” check box and protect the sheet using a password. make shure the check boxs are selected for “Select locked cells” and “Select unlocked cells”.
How to organize your python project files and folders
This is a very good description about python project structure.
How to install docker engine on Ubuntu
- install the docker engine based on official website doc
- If you can not use the docker command directly, which means you have to use sudo before the docker. Then you need to use
sudo setfacl -m user:$USER:rw /var/run/docker.sock. You need to replace the$USERto the specific user that can use thedockercommand directly.
How to use the Docker container to launch streamlit website
- create the streamlit app folder and nginx folder as shown below
- build up a streamlit website as usual
- Add
.dockerignorefile to ignore the files that you don’t like to add the files to the docker container - Add the
Dockerfilethat contain the configuration for this folder - nginx is a websever that will handle the URL.
.
├── app
│   ├── 0_Home.py
│   ├── 0_Setting.py
│   ├── activity.csv
│   ├── app_config.py
│   ├── auth_setting.yaml
│   ├── cat.json
│   ├── Dockerfile
│   ├── hello.py
│   ├── __init__.py
│   ├── pages
│   ├── pictures
│   ├── __pycache__
│   ├── README.md
│   ├── requirements.txt
│   ├── temp
│   ├── test.ipynb
│   ├── tests
│   └── utils
├── docker-compose.yml
├── nginx
│   ├── default.conf
│   └── Dockerfile
└── README.md
Dockerfile in the app folder
FROM python:3.8 # The base Docker container that you'll use to build up your Docker container

WORKDIR usr/src/app # the path of the folder in the Docker container

COPY requirements.txt . # Copy the file to the WORKDIR
RUN pip install --no-cache-dir -r requirements.txt # command line that will run in the Docker container
COPY . . # Copy all the files to the WORKDIR. the first dot means the current directory, the second dot means the WORKDIR
default.conf in nginx folder
server {
    location / { # the address of the url
        proxy_pass http://streamlit_app:8506; # the url / will redirect to http://streamlit_app:8506; the name stream_app is the name of the container name in the docker-compose.yml file
    }
}
Dockerfile in the nginx folder
FROM nginx:1.15.8 # The base Docker container
COPY default.conf /etc/nginx/conf.d/default.conf # cover the original default.conf file with the new one
docker-compose.yml
version : '3' # version number

services: # list the containers
    streamlit_app: # one container name
        container_name: streamlit_app
        restart: always # we need the website could restart itself, thus use always

        build: ./app # the address of the app folder which means the curent app folder
        tty: true # can access the content of the container
        volumes:
            - /home/path_to/README.md:/usr/src/app/README.md # mount the volume to the container. Actually you can make the same address
        ports:
            - "8506:8506" # map the container port number(first one 8506) to the stream app port number (the second one)
        command: streamlit run 0_Home.py --server.port 8506 # the command will run in the Docker container

    combiner_nginx:
        container_name: combiner_nginx
        restart: always
        build: ./nginx
        ports:
            - "8083:8083"
        depends_on:
            - streamlit_app # the combiner_nginx will only run when the container streamlit_app is on
how to install wine in Ubuntu
If you want to use pyinstaller to generate apps that can be run in Windows system, wine is an option that you can choose. Because even if you only have Ubuntu OS, you still can generte two different apps that run in Linux and Windows.
- Open Terminal and login the super user that has the right to use sudo
- install wine:
sudo apt install wine - confirm the wine has been installed :
wine --help - Download python executable file to a specific folder you want to save the file :
wget https://www.python.org/ftp/python/3.8.10/python-3.8.10-amd64.exe - Here you must have the Linux GUI to install the python through wine :
wine python-3.8.10-amd64.exe. A window will pop up as shwon below. That’s the reason why we need a Linux GUI. Otherwise the window will not pop using this method.Here you must choose the option “Add Python 3.8 to PATH” to enable that you can use the command linewine pythonto activate the python in wine. Thus you can install python packages throughwine pip install package.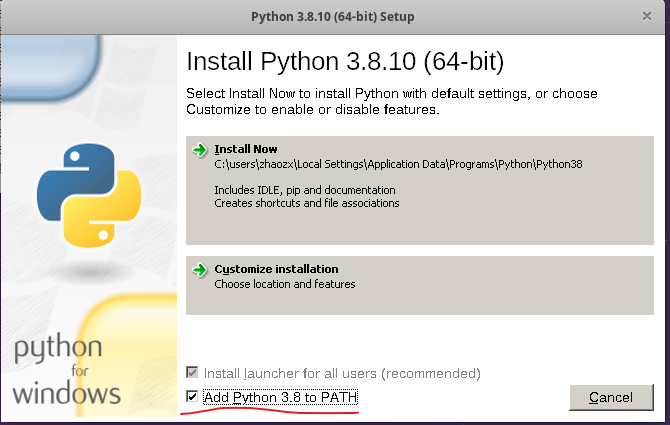
- You can choose “Install Now” or “Customize installation”. Here I choose “Install Now”.
- Check whether you can use python and pip in wine :
wine pythonandwine pip install pandas - Done!
implement OCR on PC
You can create a OCR app directily on Linux or Windows PC. The process as below.
- Write Python code to convert image to palin text. Firstly, you need to download tesseract(this is the engine for OCR) and pytesseract(python inferace for tesseract). This step is simple
- use pyintstaller to generate a executable file. If you use Linux system, and want the file run on Windows. You need to install “wine” on your Linux OS. Don’t foget to install the associated packages used in python code. Actually you could use “piprequest” to get the necessary packages.
- If you’d like to generate a icon for your app. You can wirte like these to add an icon
wine pyinstaller --icon=OCR2.ico -F app_OCR.py. Use the online method to convert your picture to an windows icon. - Meanwhile if you run the software,you need to install tesseract on you Windows PC. Here is the Windows tesseract installer. Install it in a specific folder, because we need the “tesseract.exe” in that folder.
- now you can change the link of pytesseract.pytesseract.tesseract_cmd like
pytesseract.pytesseract.tesseract_cmd = config['path_tesseract_cmd']. config[‘path_tesseract_cmd’] is the absolute path to the “tesseract.exe” - Create a soft link and place it on the desktop. Now you can use the OCR technique to convert the picture to plain text
VSCode 链接remote server
本地电脑不给力,想充分利用远端server的算力。那么可以使用VSCode,直接链接remote server。方法非常简单
- 下载VScode并安装
- 打开VSCode并在下载界面安装Microsoft出的
Remote - SSH插件 - 在最左侧边栏会出现
Remote Explorer,点击并连接 - 你可以能也需要安装
Pylance插件,来帮助你选择在server端的环境 - 如果你想在VSCode中使用Jupytr Notebook,则需要在虚拟环境下安装
conda install -n recon ipykernel --update-deps --force-reinstall - 现在准备工作完成,可以开心的写代码了。
在Linux电脑上安装Java
- 从官方下载Java安装包 : 如果是 Ubuntu 选择 “x64 Compressed Archive”
- 把下载的文件夹放到你想放的目录下,你可以选择创建一个文件夹例如:/usr/java/
- 解压Java压缩文件:
tar zxvf jdk-18_linux-x64_bin.tar.gz - 把java目录添加到Linux Path中。可以在
~/.zshrc中进行修改:PATH=$PATH:/usr/java/jdk-18.0.1.1/bin。这是因为java的可执行文件放在bin中所以
在Linux电脑上进行zip和unzip
zip OPTIONS ARCHIVE_NAME FILES like zip archivename.zip filename1 filename2 filename3
zip archivename.zip filename1 filename2 filename3

zip -q archivename.zip filename1 filename2 filename3
# quiet

zip -r archivename.zip directory_name
# subdirectory in directory

# unzip

unzip latest.zip

unzip -q filename.zip
# quiet

unzip filename.zip -d /path/to/directory
# to another folder
在Linux电脑上安装wine来运行Windows软件
以下以在Ubuntu OS上安装wine,使用wine安装python3.8,然后使用pyinstaller生成可以在windows上运行的脚本软件
- 在Ubuntu上安装wine :
sudo apt-get install wine - 下载windows运行的software . 例如下载python :
wget https://www.python.org/ftp/python/3.8.10/python-3.8.10-amd64.exe - 安装exe文件
wine some.exe:wine python-3.8.10-amd64.exe。可以customize the insntallation process - 安装 pyinstaller :
wine pip install pyinstaller - 使用pyinstaller生成可运行的windows software :
wine pyinstaller test.py
更改GitHub personal token
创建新的Personal Token
在电脑上更新
- 使用
command+ 空格搜索 Keychain Access - 在弹出界面中搜索
github - 在github login 这一行选中,右键,删除。
- 在Terminal端进行push。填入Username , 在Password选项粘贴personal Token。
- 完成
引用本地link
图可参考python知识点
[python知识点](/docs/plot_graph#pltbar)
直接以/docs/...开头,后面如果不确定可以在web中点开查看后面内容。 open the markdown file, and hit the title, then you will see the full link of this title in the browser input box.Copy the part starting at /docs
写公式
<img src="https://render.githubusercontent.com/render/math?math=\| w \|_2^2 = \sum_{j=1}^{m}w_j^2 ">
在math后面写你想写的公式。如果有些符号不确定可参考Latext pdf 文档
在公式中写加号+
在GitHub markdown 的公式中填写加号+,使用%2B。
install nodejs from source file
sudo cp -r node-v14.15.5-linux-x64/{bin,include,lib,share} /usr/
其中核心思想就是把想要安装的package中的bin,include,lib,share 文件夹中的内容放到你当前env下的相同文件夹中。可使用 ·which node·来查看当前node安装的路径。 然后把 /usr/ 换成env下的路径。此方法可以延伸到手动安装其他的package
python 在terminal输出颜色标记的文字
from datetime import datetime

class bcolors:
    HEADER = '\033[95;1m'
    OKBLUE = '\033[34;1m'
    OKCYAN = '\033[35m'
    OKGREEN = '\033[32;1m'
    WARNING = '\033[91m'
    FAIL = '\033[31;4m'
    ENDC = '\033[0m'
    BOLD = '\033[1m'
    UNDERLINE = '\033[4m'
    RED = "\033[31;3m"
    GREEN = '\033[32;1m'

def message(message,color=bcolors.OKGREEN):
    """print the message using color and time stamp
    color : bcolors
    message : string
    """
    timeStamp = datetime.now().strftime('%Y-%m-%d %I:%M%p')

    print(f'[{timeStamp}] : {color}{message}{bcolors.ENDC}')
如何建立Google API
首先需要在Google Developers Console中创建或选择一个项目,然后自动打开API。这一步操作可参考python 读取Gmail.
Navigation Menu -> IAM & Admin -> Creat a Project -> write your project name and hit create. Next step is to enable the APIs that you want to use.
链接 Gmail
Chose the Project name near Google Cloud Platform, Then choose Enable APIs & services and then hit +ENABLE APIS AND SERVICES. Now you can search the API name, such as “Gmail API” or “Google Sheets API”. Hit Enable, now the API is enabled. The next step is to add CREDENTIALS. Hit CREDENTIALS and + CREATE CREDENTIALS to select ‘OAuth client ID’ -> Configure consent screent -> internal -> create -> write the App information, fill all the asterisk cell.
If you are in the newly created project, you need to configure the consent screen at first. After that, hit Enabled APIs & services to add and enalbe APIs. Search the APIs and enable.
Download the credential, if there are some token.json that revoked or despired. You need to delete them first, and use the newly gnerated credential.json to log in your gmail account to generate new token.json files.
All Done!
使用Google API 和 Python处理spreadsheet
use python to handle spreadsheet
import os
import pandas as pd
import os.path
from google.auth.transport.requests import Request
from google.oauth2.credentials import Credentials
from google_auth_oauthlib.flow import InstalledAppFlow
from googleapiclient.discovery import build
from googleapiclient.errors import HttpError
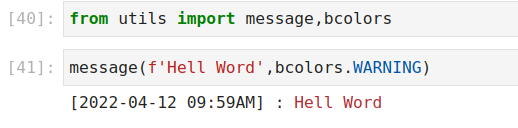
from utils import bcolors, message
SCOPES = ['https://www.googleapis.com/auth/spreadsheets.readonly']
def gsheet_api_check(path_json_cred,SCOPES):
"""Check and create credential
Parameters:
---------
- path_json_cred : str
- SCOPES : str
like : ['https://www.googleapis.com/auth/spreadsheets.readonly']
Reuturns:
---------
- creds
"""
creds = None
if os.path.exists('token_spreadsheet.json'):
creds = Credentials.from_authorized_user_file('token_spreadsheet.json', SCOPES)
if not creds or not creds.valid:
if creds and creds.expired and creds.refresh_token:
creds.refresh(Request())
else:
flow = InstalledAppFlow.from_client_secrets_file(path_json_cred,SCOPES)
creds = flow.run_local_server(port=0)
with open('token_spreadsheet.json','w') as token:
token.write(creds.to_json())
return creds
def pull_sheet_data(creds,SPREADSHEET_ID,DATA_TO_PULL):
"""Extract values from spreadsheet
Parameters:
---------
- creds : output of gsheet_api_check
- SPREADSHEET_ID : str
- DATA_TO_PULL : str, A1 notation (https://developers.google.com/sheets/api/guides/concepts)
like : 'Sheet1!A:A'
Returns:
---------
- values : List
"""
service = build('sheets', 'v4', credentials=creds)
sheet = service.spreadsheets()
result = sheet.values().get(
spreadsheetId=SPREADSHEET_ID,
range=DATA_TO_PULL,majorDimension = "COLUMNS").execute()
values = result.get('values', [])
if not values:
message(f'No data found in {DATA_TO_PULL}',bcolors.FAIL)
else:
return values
def convert_spreadsheet2df(spreadsheet_id,sheet_name,list_columns, columns_name=None):
"""Get data from spreadsheet and convert the data to dataframe
Paramerters:
---------
- spreadsheet_id : str
- sheet_name : str
-list_columns: list of string
like ['A','B','E']
- columns_name : list of string
like ['name','age','sex']
"""
list_df = []
length = None
for c,n in zip(list_columns,columns_name):
data_range = f'{sheet_name}!{c}:{c}'
data = pull_sheet_data(creds,spreadsheet_id,data_range)
df = pd.DataFrame({n:data[0][1:]})
list_df.append(df)
df_concat = pd.concat(list_df,axis=1)
return df_concat